Howdy, Internet~Land! In the last week or so, I’ve been working on videos that show how to make your own doll stands. I posted the tutorial back in January of 2018, so you can look that up in the archives for a list (& photos) of materials. Today I wanted to share the links to two videos that show the work in progress, as well as a way to modify it for larger dolls. Hope it’s helpful. Wishing you all a very Happy Thanksgiving!
Month: November 2018
Occasion for Celebration!
Happy Saturday, to you all in Internet~Land! This has been a very tiresome, but very happy week. Tiresome because I work long hours away from home, but happy because I’m determined to enjoy life. I was so tickled to see my YouTube channel reach 100 Subscribers this week. I totally realize that not all Subscribers will always stay, but I am celebrating this moment! I enjoyed having some “high-fives” with my friends and family, as well as preparing a new variation to a favorite pattern for you. I love taking time to stop and fully embrace this stepping stone in a marvelous journey. Sometimes life is just hard. Sad things happen. Difficult things happen. Scary things happen. So, I make sure to take notice and be thankful for all the good things that happen ~ the joyful things ~ because they’re always there if I’ll look for them.
To include you in my celebration, I have adjusted the Lacey Light Gown pattern to also fit Wilde Imagination Evangeline, Ellowyne, and MSD sized BJDS. I believe it can also work for the 50cm Obitsu girl. It’s probably not an exact fit, since it is a straighter styled gown, but that allows it to be easily adjusted for a wide variety of dolls. I hope you will enjoy using it. The pattern will be available as a free PDF download through the month of November 2018, and it’s posted for you on my Ready To Print page. Thanks again!
Continuing the Doctor’s Outfit
Happy Friday, all you friends in Internet~Land. November has arrived! Here in the US Northwest, we are enjoying a beautiful sun-shiny day. The clouds have rolled aside for the time being to give that crisp fall glow to a rainy week. I love living in Oregon. If you don’t like the weather now, just wait a bit, because it’s bound to change.
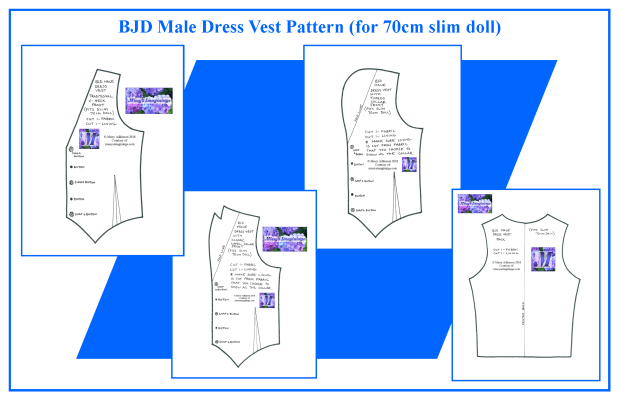
This week I have had a couple new developments in projects. The first is adding the lined suit vest to The Doctor’s outfit. I have completed the video and will link it below. For some reason, this outfit is being done in stages. I get one piece done, and then get excited for another project. Still, I always come back to make the next garment. He still needs his necktie and suit coat. Then, of course, he will need his long trench coat. I have made many of the Doctor’s coats, but they were all in a 1/4 scale to fit the Tonner version of Doctor Who with the Matt body style. Now I will need to enlarge it for the 70cm fella. My niece made me an awesome 1/4 Sonic Screwdriver, so now I will see if she can make one in the 1/3 scale. That and a pair of 3D Glasses should complete his look. I will post a couple pictures after the video link showing the vest pattern pieces and how the collar variations look when finished. The Free PDF is ready for you on the “Ready To Print” page.
My second project has been researching for my Brother Exedra Industrial Machine. I was doing some test sewing, and the needle (which was small and very, very, very-very OLD) just snapped. I thought, “OK, I’ll just go in to JoAnn’s and get another one.” Easier thought than done. I bought some needles, only to find the shank was too large to fit my machine. So, my next stop was at our local specialty sewing store. It was there I learned that the machine I purchased requires specialty needles. …of course it does… Well, I spent a substantial amount of time searching the internet to find copies of the specs & operator’s manual. I took these back to the store to see if they might be able to order what I needed. I was so glad they actually had some in stock! … that didn’t fit… I spent more time pouring over the paperwork and made a discovery. So, back to the store I went. I learned that even if needles are in the same class, their shank sizes can change according to the particular gauge of the needle. In the end, I needed DBx1, size 16. They also had these in stock, and voila! They FIT!!! Now I’m ready to start working on an idea I had for a unique kind of throw blanket. I’ll probably film my progress to let you know if my idea works. In the meantime, enjoy the vest pattern & happy sewing!