Happy day to you, Internet~Land Friends! Since my custom sculpt BJD arrived & now has an appropriate wig, it is time to make him some clothing. Last time, I posted a video tutorial on drafting my set of Basic Pieces for this doll. Again, he has the Resinsoul 70cm slim male body. Today I will show how I use my basic pieces to design a dress shirt. I will show a photo of the completed pieces below the video link, and the set will, of course, be posted on both the “Free Stuff” overview page and as a PDF download on the “Ready To Print” page. Enjoy & happy sewing!
Whew! Good morning & good NIGHT, Internet~Land! I’ve been up all day & all night working on a project. I’ve been striving to learn my video editing program. Not yet an expert, but having fun (and grumbles) on the journey. Here’s a new video of one method I use to draft doll patterns. I thought this might better explain than just photos, and it was fun to show the entire process from beginning to end. The finished pattern pieces are available to download from my Ready To Print page. Enjoy, and now I’m off to bed!
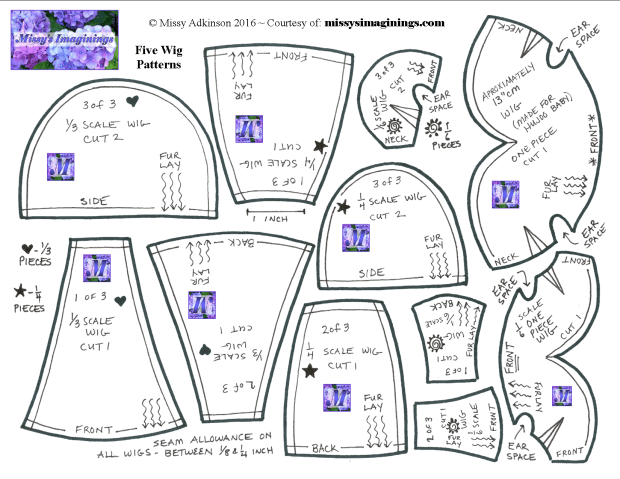
Good evening, all you in Internet~Land! Ahhh ~ the joy of a Friday night at home with no alarm scheduled for the morning. That means I can stay up late to get everything ready for posting on the blog! Tonight I’ve had a lot of fun with my new arrival, the David Tennant sculpt face on a Resinsoul body. As some of you know, he came as Shakespeare’s King Richard ~ long hair, robe, crown, & cross. Cool, but not quite the character I have in mind. So ~ tonight I went to work. I have a set of clothes to keep him dressed, but definitely not his permanent look. That will need to wait a while. No, tonight was the night to get his hair in order. I posted a video of sewing together his new wig, and will put photos of the finished product below. The black one in the video thumbnail was just to keep him from being bald! I’m very happy with how it turned out. I’ll also post photos of the steps I mentioned in the video about hand sewing the edge & adding the elastic. Finally, as a fun freebie ~ I’ve added a sheet of wig patterns to the “Ready To Print” page. Now, it will be your turn to sew up something extraordinary!
Once the pieces are sewed together, I hand-tacked the edges up about 1/8 of an inch, being careful to only catch the fabric and not stitch down the “hair.” With the “hem” in place, I sewed the ends of the elastic together and then tacked it to the wig at four points (center front, center back, and the centers of each side.) Once the elastic was secure, I stretched it out as I sewed it to the edge of the wig. I rolled up a washcloth for “bulk” to stuff inside and give assistance to my tired fingers. Continually stretching will make your hands weary. Lastly, I added the sideburns & gave him a nice haircut to add the shape I wanted.
KODAK Digital Still Camera
KODAK Digital Still Camera
KODAK Digital Still Camera
TA~DAH!!!
And now here is a picture of the wig pattern set. It contains three “Three Piece Patterns” and two “One Piece Patterns.” I’ve used all of them at one time or another. Feel free to print yourself a copy!
Howdy, howdy, Internet~Land! So today, I received a new arrival in the mail & thought I’d post a box-opening video & chat. So, if you’re interested in seeing the “real” me ~ just home from a 10 hour work day ~ have a “click” and join me for a bit. 🙂
Happy Friday, friends in Internet~Land! This week I’ve had to deal with some pesky medical things, so just wanted to post something for fun. My daughters made another silly video ~ hope it gives some smiles & laughs ~ enjoy!
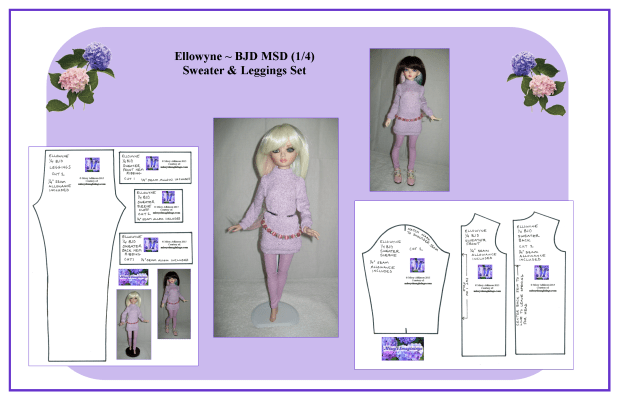
Howdy, all you sewers in Internet~Land! A new friend in one of my facebook doll groups asked about a leggings pattern for a MiniFee. Well, I thought, why not just post it tonight for everyone? I made this set a while back just to have a casual outfit for shopping & stuff. I used a stretch knit for the leggings (with narrow elastic waist) and a looser sweater knit for the actual sweater. It even has a slight sparkle to it. To add a finishing touch, I strung a beaded belt on some clear stretch line. Tadah ~ the girls are ready for fun!
As always, this free pattern will be shown on the “Free Stuff” page and listed as a downloadable PDF file on the “Ready To Print” page. Enjoy & Happy Wednesday!
Good morning & happy Friday, Internet-Land. Today I have a new look for Mae. I hadn’t done a fairy paper doll outfit for quite a while, so I decided to draw one for her. I was just in a “swirly” mood, I guess. This weekend we have some graduation activities, as well as some of my other projects that need attention, so I just wanted to hop on here real quick to say “hello” and post this set. I will also post the photo of this outfit on the “Free Stuff” page and add the updated PDF file (with doll & all her outfits) to the “Ready To Print” page for an easy download.
If you’re new to my site ~ welcome! I’m so glad to have you stop by. For those who are just now visiting, you may notice that some of the older blog posts do not show the “free items” they introduce. A while back, I did some site “house cleaning & rearranging.” Now, ALL the free items are pictured on my “Free Stuff” page, and the PDF version of each file is listed on the “Ready To Print” page. Just look over the “Free Stuff” page, see what you might like, then go to the “Ready To Print” page to click on the file & print or download. Hope that all makes sense & is not too redundant! Have a great weekend! ~ missy