Good evening, all you in Internet~Land! Ahhh ~ the joy of a Friday night at home with no alarm scheduled for the morning. That means I can stay up late to get everything ready for posting on the blog! Tonight I’ve had a lot of fun with my new arrival, the David Tennant sculpt face on a Resinsoul body. As some of you know, he came as Shakespeare’s King Richard ~ long hair, robe, crown, & cross. Cool, but not quite the character I have in mind. So ~ tonight I went to work. I have a set of clothes to keep him dressed, but definitely not his permanent look. That will need to wait a while. No, tonight was the night to get his hair in order. I posted a video of sewing together his new wig, and will put photos of the finished product below. The black one in the video thumbnail was just to keep him from being bald! I’m very happy with how it turned out. I’ll also post photos of the steps I mentioned in the video about hand sewing the edge & adding the elastic. Finally, as a fun freebie ~ I’ve added a sheet of wig patterns to the “Ready To Print” page. Now, it will be your turn to sew up something extraordinary!
Once the pieces are sewed together, I hand-tacked the edges up about 1/8 of an inch, being careful to only catch the fabric and not stitch down the “hair.” With the “hem” in place, I sewed the ends of the elastic together and then tacked it to the wig at four points (center front, center back, and the centers of each side.) Once the elastic was secure, I stretched it out as I sewed it to the edge of the wig. I rolled up a washcloth for “bulk” to stuff inside and give assistance to my tired fingers. Continually stretching will make your hands weary. Lastly, I added the sideburns & gave him a nice haircut to add the shape I wanted.


TA~DAH!!!

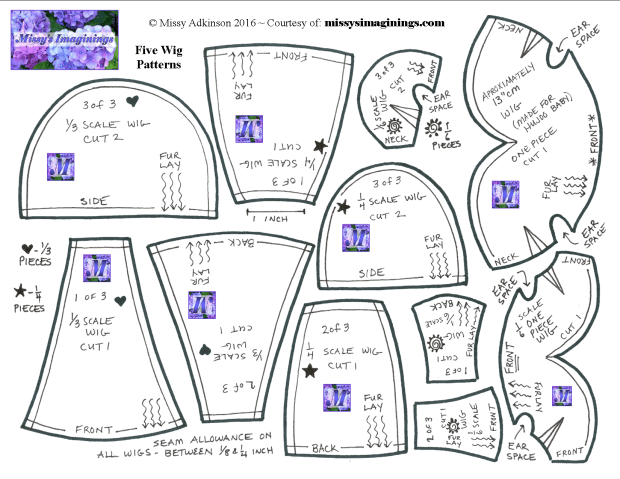
And now here is a picture of the wig pattern set. It contains three “Three Piece Patterns” and two “One Piece Patterns.” I’ve used all of them at one time or another. Feel free to print yourself a copy!