Hello Hello, Internet-Land! This morning I’m happy to post another sewing tutorial. I’ve been getting a couple tutorials ready, as my hand surgery is scheduled for TOMORROW! Very excited to get my hands fixed, but that means big bandages on BOTH hands for a few days. I thought I’d better get things ready & start posting them. Today we’ll be going through the steps to make a pants pattern. Here we go!
SUPPLIES
The first step is to gather the things you will need and the doll you want to fit. Since I already have pants patterns for Matt, I’m going to be using my Tonner Peter Pevensie. He’s been naked & needing clothes for quite a while now! He has the same body style as Wilde Imagination Mortimer. My supplies are: .25″ graph paper, pencil & eraser, tape measure, and a 12″ ruler.
MEASUREMENTS
First, I gather all my measurements. I measure the waist (I will use the lower waist for these men’s pants.), waist/leg length, waist-to-front crotch, waist-to-inseam, thigh diameter, calf diameter, and foot-heel diameter. Remember, our dolls are not soft like us, but usually hard plastic or resin. This means that really skinny pantlegs will need to be big enough around to clear the heels or have ankle slits (with zippers or snaps), so they can actually go onto the fella!


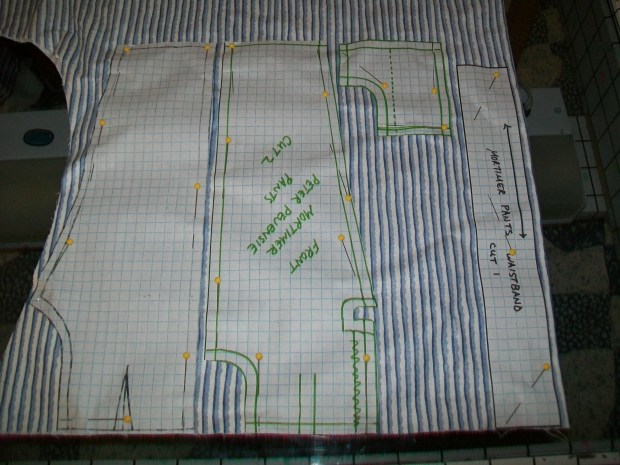
DRAFTING THE PATTERN
Time to start drawing! I begin with a straight line down the center of my paper. I used 8.5 x 11 inch graph paper. You just need paper that is long enough for your pantlegs. Now my measurements come into play. I measure down from the top of the paper on my straight line and mark the measurement of the waist-to-front-of-crotch (not to inseam). I also allow an extra quarter inch that I will need at the top for a seam allowance. The straight line will be my outer side seam, and the mark I made will be the point from which I measure out to indicate the crotch line and inseam. I like to use graph paper, because the horizontal lines are a huge help in making sure my lines are continually 90 degrees out from my side seam line. From my first mark, I measure out 3.25 inches. This is half the diameter of the thigh plus a half inch to allow for looseness and seam allowance. From the top, I measure out 2.25 inches. I rounded the waist up to an even 9 inches to have room for a good fit. If you only use the exact doll measurements, clothes will usually end up too small. Now I place in a dart to have a nice fit in the back. Without it, the pants would go straight up like a stovepipe, rather than curving in nicely over the bum. Because the darts will take the waistline in, I add a half inch to the outside of the pants side seam. Next, I make sure the waist-to-crotch line has the correct measurement. I like using the tape measure here, because it easily curves with the line.


At the bottom of the photo, I have indicated half of the ankle measurement (with a little looseness added) for the hem line. From the hem line, I measure straight up one half inch. To draw the inseam, I draw a straight diagonal line (from the half inch mark I just made) that goes up to my 4.75″ mark and out .5″ from my original hem mark. Then I continue this line, gently curving it to meet the crotch line. The way you configure this line will determine the “look” of your pants. The “straighter up” the line, the “skinnier” the leg. For this tutorial, we will have a looser fitting leg, so there is more slant to the line from the hem to the crotch. Now you just need to add seam allowance to both sides for a finished Pants Back Pattern Piece. (Going from the very top to bottom of the paper will give enough length.)


To draft the front, I put the back piece under a new sheet of paper and place onto my light table. I indicate a pocket line at the side. The longer line of the pocket will be the finished edge, and the shorter line is the seam allowance. To make the front crotch and fly, I go in from the crotch-inseam about one half inch and then curve up one half inch. The fly will come straight down from waist edge almost equal to the crotch marking. This provides room for the overlap of the fly and the needed seam allowances. It also gives enough room for a small front pleat. (You can see where I scribbled to extend the fly allowing more fabric because of adding the pleat.)
Next will be the waist and pocket pieces. I always make my waistband pieces longer than I need. It is simple to shorten it if needed, but you can’t lengthen it once it’s cut! I add about an inch to my waist just to be safe. The pocket piece will again use the light table. I trace the outer pocket edge and add my inside width and length. Then double the width to allow for the “fold back” or inside section of the pocket that actually shows on the outside of the pants when finished.


And now you’re ready to cut out your pieces! You will need two of the pants front, pants back, and pants pocket. Then just cut one of the waistband.
SEWING!
OK ~ Here’s your BONUS! We’re also going to put these pants together today! 🙂 Remember ~ all seam allowances are .25.”
First, I do all my “prep” work. Mark the darts and pleat lines onto the wrong side of the fabric pieces. Then finish the inside edges of the fly by serging or zig-zagging.


Second, I sew the darts and pleats. Fold the darts down the center and sew from tip to edge. For pleats, match lines and sew on lines. I actually only sewed .75″ rather than the full length of the lines on my pattern. Press them towards the center/crotch line.


Third, we’ll put in the pockets! With right sides together, stitch the curved edge of the pocket. Then trim the seam allowance to one eighth inch. Turn the pocket right-side-out and topstitch one eighth inch away from sewn edge. Remember ~ you’re only working with the curved edge of the pocket right now ~ not the side! When the topstitching is done, fold the other edge of the pocket fabric to the side seam of the pants. The pocket will have about a quarter inch fold (or pleat) at the top along the waistline. Press this down flat.


Now finish the bottom edge of the pocket by serging or zig-zag, as it will show in the finished garment. When the bottom is done, I stay-stitch the top edge of the waist at one eighth inch laying down the both pocket pleat the pants pleat fabric towards the center. Then I stay-stitch the side seam of the pocket to the side seam of the pants. Do the same process to both pieces of the pants front.


Fourth, we will put the fronts together. With right sides together, sew the crotch fronts together along the line. I then do a tiny zig-zag along the crotch line to reinforce it, trimming off the excess seam allowance. The next part of the front can be a little tricky. Since men’s pants overlap from the left, you will fold the left side of the fly in so that the folded edge is flush with the center front of the pants. The right side of the fly will only be folded in .25″ so it will fall behind the front of the fly when finished. Topstitch both the folded edges down almost to the crotchline. Next, lay the pants front flat and topstitch from the stitching you just did to the center/crotch front seam. This will secure the bottom of the fly as shown.


Fifth, sew and finish the back crotch line. Then pin fronts and backs together, sewing & finishing the sideseams. Then finish and sew the hems.


Step six is to add the waistband. With right sides together, pin the center of the waistband to the center back of the pants. Continue pinning each side until you get to the center. Here is where you can trim off excess length of the waistband if you need to do so.Then fold ends in and stitch waistband to pants. Now fold under unsewn edge of waistband and either hand sew or machine sew edge inside the pants. All that’s left is to pin and sew/finish the inseam!


Ready for a fitting test!


Looks good! Now you’re ready to give it a try! If you would like to have the finished version of this pattern, I will be posting it in my “Free Stuff” tab and on my facebook page:
http://www.facebook.com/missysimaginings
Enjoy & have a wonderful week! Catch’a later!
