Good evening, Internet-Land. Still fighting a really bad virus has kept me stuck at home. As I’ve been going through my files and updating the site, I noticed I had all the photos done for a tutorial I NEVER posted! So, tonight’s the night. This will be pretty simple, but will hopefully inspire you to move forward with more great creations of your own. I don’t actually have a model of Mortimer, but I do have Peter Pevensie, who has the same body. He’s just not quite as popular as Mort. This pattern can also be used for 45-55cm BJDs. So, let’s start with what you need:
MATERIALS
Gather these items: Your doll, measuring tape, pencil & eraser, paper (I like to use graph paper when making a pattern with this method.), and scissors.
WHAT TO DO
First, you’ll need to measure your doll. Take measurements for the center front and back from the base of the neck to the length you want your shirt. Also measure the widest girth around the chest.


Then measure from the top edge of the shoulder down the front and down the outside of the sleeve. Sleeve measurement can be for long or short sleeve, but in this tutorial we will be making a short sleeve.


Now with your measurements, you are ready to start drawing your pieces. I always work out from the center. Draw a 9″ center front line down the page. Make a mark 7″ up from the hem. This will be the front of the neckline. Measure 2.75″ inches out to the side, and draw a line parallel to the center line. This is the side seam. The next part may sound a little tricky, but it’s not that bad. On your side seam line, measure up from the hem using the shoulder measurement. Draw a 1 5/8″ perpendicular line back towards the center line. I used graph paper, so just followed that point back to the center. Then I marked down the side .25″ from that line to create a sloped shoulder line. Once that was done, I drew a 2″ curved neckline from the center front mark to the top of the shoulder as shown. Don’t forget to add .25″ to the neck, shoulder, side, and hem for a seam allowance. Fold the paper on the center, and cut out your front piece.


Now you will keep this folded front and use it as a guide to make the back piece. On a new sheet of paper, make another line down the page that will be the center back. Be sure to allow room for a seam allowance down the center back, as the center back will have a seam. Trace all around the front, then raise the neckline as shown. When you cut the back, you will cut it as half of the back, and will use two pieces for sewing. I also show where I mark the pattern back to show how far up the sewn seam will go from the hemline. This allows for a wider head opening (which is especially helpful if making for a BJD, since they can often have larger heads).


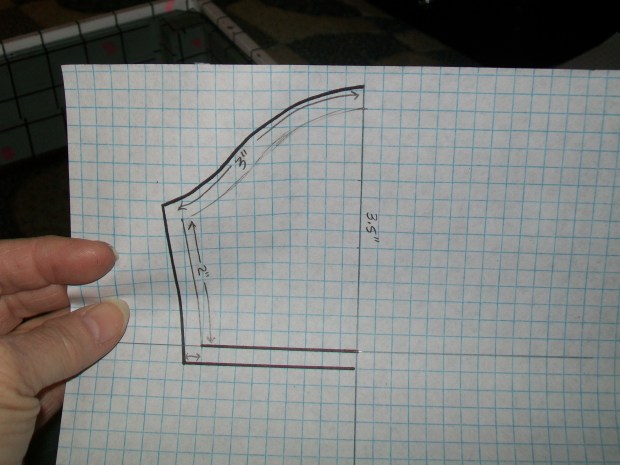
Next is the sleeve. Again, I start with a center line for the sleeve, marking the finished length. The widest part of the sleeve is 2.5″ from the center. The hemline is 2.25″ from the center. The 2″ diagonal line from the underarm to the hem keeps a more natural looking sleeve that does not flare way out at the hem when finished. Then I make a gentle curve from the underarm point to the top of the shoulder point. This measures 3″. Be sure to once again add .25″ seam allowance to all the outside edges as shown. Now, fold on the center line and cut out your sleeve.
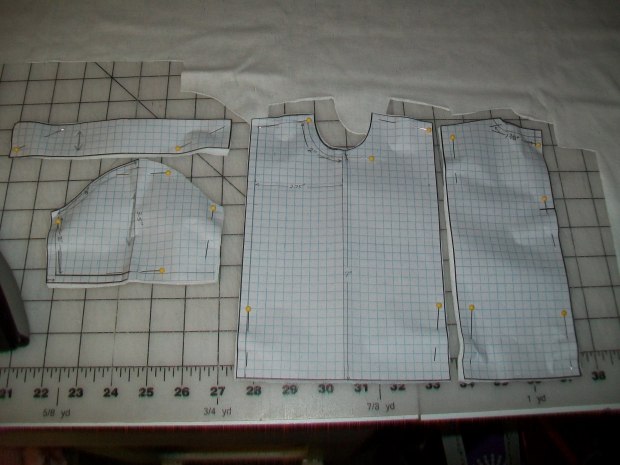
The final piece you will need to make is the collar for the neckline. Make a rectangle that is 1.25″x7.” You will cut one front, one collar, two backs, and two sleeves. All your finished pieces will look like this:
And there you have it. You’ve just made a T-shirt pattern for your Mortimer/Peter Pevensie doll! I will be adding this new pattern set image to my Free Stuff page and a pdf version to my Ready To Print page. Hope you’ve enjoyed this tutorial ~ thanks for coming!

I thank you! Just found your page and have been learning a lot to sew for my BJD
LikeLike
My pleasure! Thank you for visiting!
LikeLike