Greetings! I have had lots of people ask me if I buy patterns for doll clothing, or if I make my own. I have used patterns, but most of my clothing is from my own pattern designs. Today I thought I’d show how I go about making a new pattern. This particular pattern will be a basic dress shirt for a Tonner 17″ Matt sized doll. Hopefully you will find this helpful in turning your own ideas into cool realities!
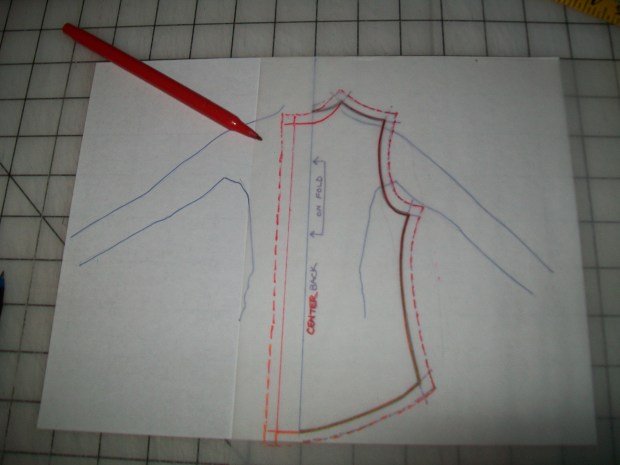
First, lay your doll on a clean sheet of paper, and do a basic trace around the shape. Remember that the pattern will not only need to cover the front & back, but must wrap around the sides, too. I then trace the center line, shoulder edges, and add an extended side edge to account for wrapping around his sides. You can measure around your doll, then make sure that your “side back half” is at least one quarter of the “around measurement.”


Once you have a shape for half of the back, draw the center line and an instruction to remember to place the center back on the fold of fabric. Next, place tracing paper over the back piece, and trace one for the front of the shirt, being sure to extend the center edge to allow for the overlap closure where you will sew on buttons and snaps. (Shown in red for the front & center overlap.) I ALWAYS add on 1/4 inch seam allowance to all the sewn edges. I’m terrible at remembering to add them when I cut, so I add the seam allowance right to the pattern pieces. (Seam allowance shown with the dotted lines.)
Now that the front and back pieces are done, it’s time to make the sleeve. Measure the solid line of the shirt that represents the arm hole, then add 1/4″. This measurement will be one half of the top line of the shirt sleeve. (Mine was 2 5/8″.) Also measure how long down the arm you want your sleeve to go. For this pattern, I will make a 3″ short sleeve. On your paper, make two perpendicular lines. Measure 3″ on the vertical line. At the top of the three inch line, draw a downward curve that measures the 2 5/8″ with the additional 1/4″ added where the line will slightly level out horizontally. Connect this curved line to the bottom horizontal line. Now you can fold on the vertical line and cut to get your sleeve pattern piece.


Lastly, I make the facings and collar. Trace the center edge of the shirt front, and make a curved line from the sew line of the outer shoulder edge, curving down and towards the center all the way to the hem of the shirt. The back facing will follow the shoulder & neck edges, and will be a curve from the outer sewn shoulder downward to the center back. These facings are nice to hide the seam allowances from the shoulders and neck edges where the collar will be attached.
To make the collar, measure the sewn edges of the complete back & both sides of the front sewn neck lines. Make a horizontal line this length. Divide it in half. Make a perpendicular line at the center measuring the height of your collar. I think mine was about 1 1/2″ high, so it has enough height to fold down neatly once my fella is wearing his shirt. Be sure to add a seam allowance. Then fold on the vertical line and cut together so both sides of the curve will match.


Now cut any pieces that you haven’t cut out yet. You should have: Back, Front, Sleeve, Front Facing, Back Facing, and Collar!

And that’s how I make a pattern! If you’re an experienced sewer, and you already know how to sew basic constructions, give it a try! Once you have your pattern, be sure to make it first with a trial fabric. Then make slight adjustments as you need for proper fitting. if you like, check back in, and I will add another post with the sewing steps for this particular project. Thank you for stopping by, and have fun making your own cool patterns!
